Upgrading CD ROM to DVD/Blue-Ray
Upgrading CD ROM? Fortunately upgrading a CD-ROM Drives is a relatively cheap option. If you answer yes to two or more of the following questions, you should consider a CD-ROM upgrade.
- Is your current CD-ROM drive a IX or 2X speed drive?
- Does your current drive have difficulty reading CD-Recordable discs?
- Does your CD-ROM still generate constant read errors, even after troubleshooting?
- Does your CD-ROM consistently make loud noises, even after troubleshooting?
- Do you often transfer data from CDs to your hard disk?
- Is your current drive incompatible with popular CD-ROM formats such as Photo-CD, multisession discs, Video CD, and so on?
Before The Installation And Upgrading CD ROM
If you've never installed or done upgrading on a CD-ROM drive before, consider purchasing a CD-ROM upgrade kit, because it will include all the necessary cabling, screws, and rails. If your PC doesn't already include a sound card and speakers, check into getting a full multimedia upgrade kit, which will add both to the mix.
However, be warned that computer press product reviews have often found these kits to be overly expensive and of poor quality. Carefully check each component of a kit to ensure you're getting a good deal. Once you've made your purchase, follow these preparatory steps
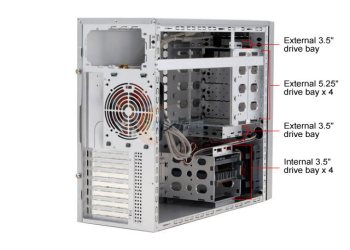
- Choose a drive bay. For internal CD-ROM Drives, you need a bay that opens from the front of your PC. If your system is bulging with components, you might need to move your hard-drive to a bay that doesn't abut the front of the PC. External CD-ROM drives, of course, require only desk space.
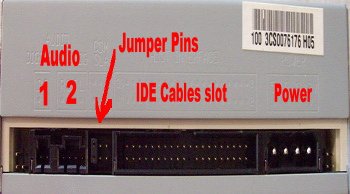
- Check cabling. Make sure you have the necessary power cable socket (usually a white plastic molding with four large pin openings) and controller cable (IDE or SCSI). Make sure they both reach the drive bay in which you intend to install the CD-ROM drive.
- Setting up the drive. An IDE device can be either a master or a slave. Set the jumpers on an IDE device before installing it. CD-ROM drives generally come from the manufacturer set as the master drive, so if that's your scenario, you won't have to modify the jumpers.
In fact to avoid potential compatibility or performance issues, it's a good idea to put the CD-ROM on the secondary controller assuming, of course, that your boot drive is on the primary controller. If you're adding a CD-ROM to an IDE controller that already has a drive attached a hard disk, for example, you might have to set the jumpers on both your CD-ROM and the hard drive.
SCSI devices require proper SCSI ID and termination settings. Set the jumpers on your upgrading CD ROM drive to a unique SCSI ID. Then set the termination jumpers if the drive is at the end of a SCSI chain of devices.
You might need to unterminate the SCSI controller host adapter card if you have both internal and external SCSI devices, because now the host adapter is in the middle of the chain, not at the end.
Installing Process

Once you've finished the drive preparation, you can start the installation process. If at all possible, try to keep the cabling inside the PC neat and organized during your work and after you've finished the job. You'll thank yourself the next time you delve inside the PC case.
- Turn off your PC and disconnect the power cable.
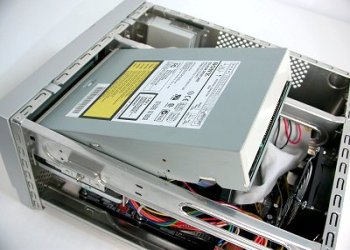
- Open the PC case and remove the front placeholder panel, which will be taken up by the front of the upgrading CD ROM drive unit.
- If your drive bay requires slide rails, attach them.
- Attach the controller cable and the power cable. (With all the cabling and cramped spaces, attaching the cables after the drive is secured in the bay can be difficult.)
- Both the controller cable and the power cable attach correctly in only one position. The ribbon data cable has a red line running along the edge for pin 1 out of the cable. Your upgrading CD ROM drive should have a small "1" that marks pin 1 on the data cable connector at the back of the drive.
If not, read the device's documentation to determine which pin is pin 1. Make sure that the red line edge of the cable and pin 1 match up, or you won't be able to access this drive.
- The power supply cable should have a rounded edge on the top two corners of the connector. The power supply port on the back of the drive will also have these rounded edges, which designate the top edge of the port. Make sure that the power cable is firmly secured in the correct position.
- Attach the audio cable from the CD-ROM drive to your sound card. The audio cable transfers the audio signal converted to analog from the digital source from audio CDs. The audio port of the CD-ROM drive is usually adjacent to the power cable port. Read your sound card's documentation to find where the connector goes on the sound card.
- Slide the CD-ROM drive into the drive bay, Make sure that the front edge fits flush with the front of the PC case. Also make sure that the drive sits level in the bay.
- Close the PC case and reattach the power cable.
See Also...
Site's Navigation
 Subscribe To This Site


Copyright 2010-2016 Custom-Build-Computers.com | Faisal Opare | All rights reserved.