How to Fit CPU to Motherboard
The learn how to fit CPU to motherboard yourslef. Installing some devices in a computer can be quite challenging and therefore one might require some assistance from an IT expert.
However, fitting a CPU to the motherboard is very easy though it seems like a difficult task to do. This task can be done by almost everyone and this article will simply help you to get this task done in about 15 to 20 minutes, so read on.
What is the best part of fitting a CPU to the motherboard? Well, first and foremost, you will not have to worry about digging deeper into your pockets paying someone else who probably learnt how to fit CPU to motherboard through an article like this one. Why not save a lot of your money by also learning the very same thing that others are learning and gain huge performance improvements.
Tips Guidelines On How to Fit CPU to Motherboard
Apart from that, you will learn how to remove an old CPU since the process of installing a CPU to motherboard is reverse to the process of removing an old CPU. The following are guidelines on how to fit CPU to motherboard.
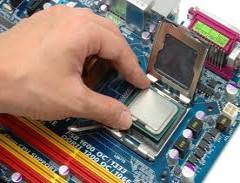
- First, before you install a CPU, make sure that the CPU is compatible to the motherboard. With so many CPU manufacturers in the market, it can be a challenge to know which one can fit in your motherboard socket. Therefore it is advisable that you ensure that the CPU will fit properly to the motherboard before installing it.
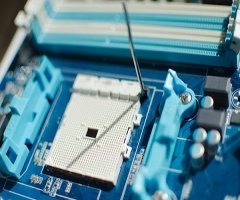
- Remember that motherboards have a certain socket size ,thus you should allow only one type of CPU to be fitted to it. when, installing a CPU, it is very easy to work with your motherboard when it is out of the case and therefore if the motherboard is not out of the case, then remove it out first before you begin working on it.
- After that, pull up the lever beside the CPU socket. For the CPU to go to the socket, try to line up the notch in the socket as well as the gold triangle on the CPU. This will make the CPU to simply drop in the right place. And hence you will not have to force the CPU in to the socket.
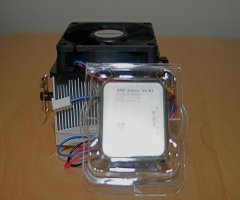
- You can know full the lever down in order to9 lock the CPU into place. If there is a plastic retainer readily available, secure the lever in it. Finally, keep the CPU cool by CPU fan installation. Start by selecting a CPU fan which is sufficient to cooling the CPU.
Why fans? Well, fans are made for processors as well as certain speeds therefore select the right fan and proper functions. Incase your CPU fan and heat sink have a thermal paste or the thermal pad, apply a very little amount to he centre of the CPU.
- In order to install CPU fan, begin by placing the fan on the processor. CPU fans use either a mounting clip or a combination of screws. There is particular mounting instructions on the CPU fan, therefore make sure that you follow them for better understanding of what you are doing.
- Remove the CPU fan after you have tighten it down to ensure that the thermal paste spread on every portions of the CPU which will be in contact with the CPU fan. Ensure that the coat is even in order to allow the transfer of heat from the CPU to the heat sink.
This may introduce some air bubbles in to the paste. After covering the processor with the right amount of paste, wipe it and repeat again without removing the heat sink.
- Finalize this process by locating the motherboard, the power lead for the CPU fan and plug the fan in.
See Also...
Site's Navigation
 Subscribe To This Site


Copyright 2010-2016 Custom-Build-Computers.com | Faisal Opare | All rights reserved.