Installing a Desktop Power Supply
The amazing ways for installing a desktop power supply. The desktop computer power source gives electricity to each equipment on your computer. The power supply unit (PSU) is in the pc's casing.
The PSU provides numerous wires that extend from your power source to the hard disk drive, CD-ROM or DVD-ROM drive, system board, Processor fan along with other casing fans. Once the power source fails, your computer has no longer sufficient electricity to support the computer's stableness.
This implies your personal computer reboots and quite often does not switch on at all. Once you buy a power source for your personal computer, the next thing is to set up an energy supply in your casing.
Easy Guildlines On Installing a Desktop Power Supply
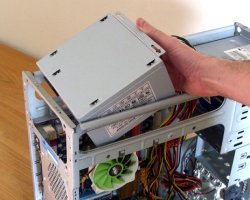
- To begin with installing a desktop power supply, start with setting up a power source, it's important to open up up the casing. The process for opening up the casing may vary dependant on its structure. Many new casing make use of either a panel or doorway while old devices need the whole covers be taken out. Make sure to clear away any screws attaching the cover to the casing and place them away.
- As soon as the power source is placed to the pc case, the power wires are affixed to all main parts. A couple long white wires are affixed to the system board. This allows electricity to your primary, main component. You may recognize the wires that affix to various parts by the connection form. For example, a hard drive link from your power source just matches the hard drive's back power adaptor. A few of the Led lights and power switches on the pc casing are manipulated by inserting in wires to the system board. Most wires are marked, which means you are sure you link the proper wire to the correct motherboard adaptor.
- If the pc currently has got the system board set up into it, the power brings from your power source have to be connected. Newest motherboard utilize the huge ATX power connection which gets connected to the outlet on the system board.
- Several things dwell inside a personal computer casing which need electricity from your power source. The most typical system is the numerous hard disk drives and CD/DVD drives. Usually all these utilize the 4-pin molex style connection. Find the right size power leads and connect all of them in to any devices that need electricity.
- Be sure that the voltage turn on the rear of the power source is fixed to the proper current level for your location. North America and Japan utilize 110/115v, while European countries along with others use 220/230v. Generally the switch can come predetermined to the current settings for your location.
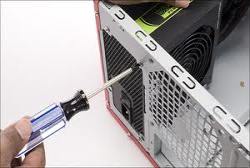
- At this stage all the set up and electrical wiring ought to be finished with the power source. Change the personal computer covers or panel to the casing. Secure the covers or panel with the anchoring screws which were formerly taken out to spread out the case.
The power wire for that pc connects to the rear of the power source. Connect the wire and turn on the pc. If your pc powers up and the BIOS starts to a boot monitor, you are aware of the power source being linked correctly.
It is critical to connect power correctly, so be sure you look at system board requirements prior to inserting in power source wires to your personal computer components.
The power source maintains constant electricity to parts, so forget about troubleshooting and installation as it is necessary only when there's a problem. If the part begins to crash, your computer might restart suddenly or it might not switch on in any way.
These are a series of common indicators that a brand new power is required. If you like this article and you have any expirience in installing a desktop power supply, please leave us a coment inthe coment box below.
See Also...
Site's Navigation
 Subscribe To This Site


Copyright 2010-2016 Custom-Build-Computers.com | Faisal Opare | All rights reserved.